How to prepare a delicious omelet

How to prepare a delicious omelet
How toprepare a delicious omelet
Prepare an omelet is a challenge that anyone who likes cooking must face, but you should know to make an omelet is simple but make a good omelet it is not.

The first thing we need are the ingredients: potatoes, eggs, onion, salt and oil. We must use good ingredients, potatoes should be soft and mealy pietas never, fresh eggs and if they are better corral, good soft onions and olive oil.

We have to take a good pan with nonstick in good condition so that we are not sticking, advice is only use it to make tortillas and fried eggs. A handy trick you can use if you do not have a good pan so that you will not stick omelet is to cover the bottom of the pan with salt, then fry until it turns brown lightly, then we remove the salt with paper towel or cloth and you can already use the pan without the risk of food sticking to you.

The whole process of development is done by eye and is almost impossible to make an omelet with exact amounts. The important thing is that the ratio of the ingredients is correct. A rule that you can use if you like curd is: per potato the size of a fist and put an egg if you like very juicy for every 3 potatoes put 4 eggs or 5 if they are small. It is always better if in doubt put a sin egg rather than less.

DEVELOPMENT
First we peel and cut potatoes, some people prefer to cut them into thin slices and diced other important thing is that they all have a similar size to that take the same time in the making. Once cut we take good handful of salt and put them in hot oil.

Now cut the onion into pieces not too small, the amount of onion is in taste, from those who do not like and do not put or put a tiny onion, even those who like a lot and put one or two onions omelet depending on size onions and potato omelet, you have to try to come up with the formula that you like. Not to cry when cutting an effective trick is to do under the extractor fan on or in a drafty place, try it see how it works.

It's time to fry the potatoes in plenty of hot oil. The oneness must be between fried and boiled, fried almost but not quite crisp. So do not run the risk of being left raw and all the oil will drain better. When almost cooked potato onion will miss with three minutes is sufficient to list, but here also each master has his own little trick and many with the fried potato from the start.

While the potatoes are fried can go whisking eggs in a bowl and add to these a pinch of salt. To come out very moist separate the yolks from the whites and assemble these until stiff, we can also add a teaspoon of yeast and get the same effect. If we want to be juicier will add a splash of cold milk.

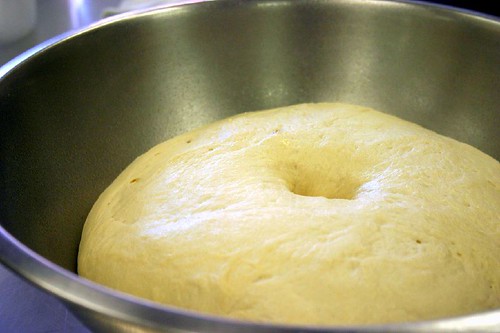
When the potatoes are ready drain them oil well to leave no oily and threw in the well beaten eggs and let the mixture sit 10 minutes and get the potato to soak and acquire the right consistency. The egg must cover the potatoes and onions.

Now put a tablespoon of oil in the well clean pan and when hot pour the mixture and let it do 1 or 2 minutes depending on whether we like it more or less curd.

We also need to have on hand a plate with which we will turn over the omelet and this should always be larger than the pan to avoid problems at the time to give it back and so afraid, we must make a quick and safe movement firmly and decisively. We put it on the pan and held him tightly with one hand while you use the other to turn it around by grabbing the handle. Now we just need to return the tortilla in the skillet to be finished curdle on the other side. This will take us 1 or 2 minutes if you like juicy and 2 or 3 minutes if we like curd. We spent the tables on a clean plate and Ready!

With these little tricks will get to enjoy a tasty omelet, now you just have to practice. And if you want to savor a rich omelet at any time without any effort be sure to try our delicious omelets.

10 most common errors that ruined Italian food

Italian cuisine is one of the most international but, as with all regional preparations globalize, on the road has lost many of its fundamental aspects. Worldwide eat pasta and pizza, but, in most homes and restaurants the basic rules of traditional Italian cuisine, much given, moreover, culinary dogma are not respected.
Academia Barilla, one of the most prestigious cooking schools in Italy -located in the city of Parma-, this week published a Decalogue with the most common mistakes foreigners make when approaching the Italian food. The institution, which has among its objectives "to defend and safeguard the Italian food products made by renowned artisans and appellation shoddy imitations" and "promote and disseminate the role of these products in traditional Italian cuisine" It leaves no room for heterodoxy. Or is Italian cuisine, or it is not.

The list of the ten most common mistakes is clearly geared to the Anglo diner, but in Spain, despite being closer, either we get rid of punishing the Italian cookbook. Until recently the only Italian we knew was preparing macaroni and sausage, and not just al dente, and although now is "the most" provide cover risotto, keep making errors book. For all lovers of Orthodoxy in the kitchen -and with respect to the Italian tradition following tradition is a guarantee of success-these are the ten mistakes you should never make.

10  most common errors that ruined Italian food
Add caption


1. Give the pasta as an accompaniment
Or pasta or risotto should never be served as accompaniment. Except in recipes like meat "Milanese", pasta and rice are taken in Italy as main course something that also is required if we want our calories to trigger. In Italy it is "sacrilegious" to use as a garnish, a space that is reserved almost exclusively, to vegetables.

2. To throw ketchup to pasta
The absolute height of all attacks Italian pasta recipe is accompanied with ketchup, a sauce spaghetti still bathing the middle -dorados- Spain, especially when diners are aimed at children. Academia Barilla qualify this practice as an "authentic culinary sin," although he forgets the other boat tomato sauces, which are nothing widespread in Italy. The reality is that to succeed with a good plate of pasta with tomato, you need to prepare a homemade sauce. There are thousands of recipes and, although there are very worthy products, any industrial preparation exceeds the benefits of a sauce made with fresh tomatoes in season. In winter, however, the pot peeled tomatoes may be the best alternative.

3. Cook the pasta in water with oil
In Spain is very usual squirt of olive oil to the pasta water, a practice that according point in the Academia Barilla, adds nothing to the dishes cooked. In his view, the oil should be added after draining the pasta.
Another ugly Spanish custom of the Decalogue is to forget to wash the pasta in cold water before drain it, which only serves to make it lose flavor. The Academy offers its own instructions to cook the pasta "al dente". One of the secrets, chefs say, lies in drain the pasta a minute before the cooking time indicated on the package, because the pasta will cook while making the sauce.

4. Serve the spaghetti with Bologna sauce
While the spaghetti Bologna are one of the most popular Italian dishes, the Academia Bacillary says the recipe is an international invention impossible to find in any restaurant in town that shares its name. The famous sauce, which itself is one of the basic classics of Italian cuisine, often accompanied by tagliatelle, pasta typical Bologna in Italy always cooked egg, not spaghetti.

Fussy remarks aside however much tell the difference between Academia Bacillary spaghetti and noodles is about to jump from the poles-, there are many Italian recipes that have perverted their way to international recipes. In the case of Spain spaghetti carbonation, which tend to smear cream, bleeding is particularly lacking an ingredient of the authentic Italian recipe that is made with egg.

5. Use the chicken as an ingredient in a pasta dish
"Nobody in Italy would throw chicken to pasta," says Academia Barilla Decalogue. According to the cooking school it is very typical in the US. In Spain, however, it is not at all popular. With the ingredients we seem to be more respectful, but perhaps it's because we have a similar raw material. One of the most ingrained habits in Spain is to prepare the pasta with tuna, which also make the Italians. In fact, in Italy the paste with fish or seafood is tremendously popular. Spaghetti with fruity de mare, or just with mussels, are one of the most successful preparations.

6. Ask a Caesar salad in Italy
The Caesar salad is a popular dish, present on the menus of cafes and restaurants around the world, but it is not an Italian recipe. In fact, it is very difficult to find in the country of the boot. There are different versions about the origin of the salad, but all agree that it began to pour in Mexico and later went to the US. It is believed that its inventor, Alex Cardin, which itself was designed in the Italian-restaurant that his brother, Caesar Cardin, ran in Tijuana: the Cesar's Place. While other stories place its origin in Serenade, what is certain is that Caesar Cardin patented the sauce in Los Angeles in 1948 and has since started to become popular in the US.

7. Decorate the restaurant with red checkered tablecloths and white
The cinema has exploited the image of the typical Italian restaurant with candles, great pasta dishes, jugs of wine and checkered red and white tablecloths. The first three elements may be true, but according to the checkered tablecloths Academia Bacillary are not typical anywhere in Italy.

8. Ask for a cappuccino after lunch
In Italy the cappuccino is only taken at breakfast, never after meals, when the espresso or machination (the equivalent of our cut) is taken. Not that it served in restaurants, but it is something reserved for tourists. Remember that the cappuccino is stronger than our "relaxing" coffee with milk, which in many parts of Spain is halfway between machination and cappuccino.

9. Find the Fettuccine Alfredo in Italy
Although Fettuccine Alfredo themselves are an Italian invention, no one in the country knows that name. The Alfredo sauce is a simple accompaniment for pasta made with butter and Parmesan cheese became famous in the restaurant Alfredo all Scrota in Rome, owned by Alfredo di Leloir. For some unknown reason, the recipe became popular in the United States and therefore in the world with the name you gave the seasoned restaurateur, but is only a version of the traditional Fettuccine -that donkey to say, "the butter "- one of the basic dishes of Italian cuisine, which itself can be found in any restaurant.

10. Go eat alone

The last point of the Decalogue of Academia Barilla, which could well have entitled "Italian cuisine for Dummies" - has more to do with the customs of the Italian company with the food itself. According to school chefs in Italy you will never go to a restaurant alone (which, today, is shocking if true), since the food is always enjoyed with family or friends. "The love and family is everything," says the Decalogue.

10 paths to painless pizza-making

10 paths to painless pizza-making
As you may have noticed, we’re kind of into pizza in the smitten kitchen. I mean, just a little. I can’t help it–in my mind, it combines the best things on earth: homemade bread, charred-edged ingredients, pairing well with a green salad and wine, and–the way I make it, at least–it never feels like a heavy meal.

Every time I post about pizza, I answer at least five or seven of the same ten questions in the comments, so I thought that it was time to create a FAQ on the topic that will hopefully answer all of your questions (feel free to ask additional ones in the comments) in one tidy URL. Consider this a primer for the new pizza recipe I will tell you about next.
Like the bread-making tips I shared way back in the newborn days of this site, my point of these are not to fill your head with reminders and cautionary tales that will cause you more worry when you get into the kitchen–there are enough sites that do that, I know that for many people, anything yeast-based is scary enough. Instead, I want to impart to you how easy it can be, and how strongly I feel that anyone on earth can succeed in making impressive pizza at home. I hope this helps.
pizza dough, man on moon
1. You don’t need a bread machine, a dough hook or a food processor to get it right.
I’ve said it before and I’ll say it again: people having been making bread a lot longer than these fancy machines have been around. Sure, they can knock a few minutes off your prep time (and that dough hook sure creates a smooth and supple dough), but a simple pizza dough takes so little time to make by hand, in our dishwasher-free kitchen at least, it’s rarely worth the extra dishes it will create to bust out the machines. I mix my dough ingredients with a wooden spoon in a large bowl, knead it for a few minutes on a counter, then oil that bowl and use it to let the dough rise. Dish- and drama-minimizing, it’s my favorite way to cook.
2. It needn’t take all day.
That process I described above–stir then knead–takes no more than ten minutes. If your kitchen is on the warm side, the dough takes just an hour to double. It’s certainly not the fastest weekday night meal out there, but it might just be the simplest. Nevertheless, if you’re in a hurry, you can speed up the dough rising time with a stellar tip I borrowed from Simply Recipes: heat your oven to 150 degrees, then turn it off. Place your dough in an oiled bowl in this warmed oven to rise.
how you know it has doubled enough
3. It can be ready for you when you get home.
I’ve been promising you this refrigerator tip for ages, but, sadly, that’s how long it took me to test it out. If you’d like, you can mix and knead your dough ingredients in the morning, plop them in an oiled bowl, cover it with oiled plastic wrap and leave it in your refrigerator while you go to work. The dough will slowly rise–truly developing the best flavor–while you’re away. By the time you come home, it should be doubled. Take it out, let it get back to room temperature, deflate it on a floured counter and you’re on your way.
4. You don’t need a pizza paddle.
This is another one of those tools that are fun if you have them, but are in no way a prerequisite for making pizza at home. A tiny kitchen demands that I don’t even consider such extras. Instead, I slide the pizza dough, prepped with toppings, onto a piece of cornmeal-dusted parchment paper that’s been placed on the back of a baking sheet. With a little shove-and-yank, I slide the parchment paper with the pizza right onto the pizza stone in the oven. It bakes right on the parchment paper, which I use to yank the pizza out to the oven when it’s done.
n'th picture of pizza dough
5. You don’t need a pizza stone.
Pizza stones improve the crust of pizza and breads, no question about it. But it doesn’t mean you can’t make delicious pizza without them. I have more than once baked pizza on the back of a baking sheet, lined with parchment paper and sprinkled with cornmeal, just as I described above, and been thrilled with the results.
6. You don’t need a professional pizza oven, but high heat is your friend.
One of the most salient differences between the brick-oven beast at your favorite pizza shop and, say, the smitten kitchen’s diminutive, apartment-standard white-painted oven is that the former gets much hotter than the latter–by even 500 degrees. Your best bet to get the brick-oven effect at home is to turn your oven all the way up to broil for a good ten minutes before you pop your pizza in, and step back from the inferno as you open its mighty jaws, lest you want a high-heat facial!
7. Pizza cooked under the broiler is amazing.
Speaking of broilers, there are a few in-the-know pizza types out there that swear by the broiler for making perfect, Patsys-like pizza (say that three times fast!). The technique, described in full, with a colorful story on SeriousEats.com, involves getting a cast iron skillet hotter than the fires of Babylon and cooking a pizza on the back of it for about 1.62 minutes, and is totally worth checking out.
rolling out dough
8. You can cook it on the grill, but only if you invite me over.
I absolutely love grilled pizza, and it’s a fun way to use the grill at the point in the summer when you’re so sick of steaks-n-burgers-n-skewers. Here’s my highly-refined (ha) method: Brush your heated grill with oil. Have your pizza dough rolled out, and your toppings at arm’s length. Throw the dough over the grill for a minute or two, until you get a bit of coloring underneath (shouldn’t take long). With tongs and a deep breath, flip it out onto a platter, uncooked side down. Top it as you wish, slide it back onto the grill and cover the lid. It should be ready in about five minutes.
9. You can cook it on the stove.
At Mario Batali’s Otto Pizzaria in the Village, the astoundingly good pizza is cooked on the stove, not in an oven. His product line’s stove-top (or oven-friendly) pizza pan mentions this only casually in the description, but I’ve been captivated ever since. Sadly, I haven’t tried it out [See above: Tiny kitchen, filled to capacity, etc.] but I hope to, soon.
10. You can buy pizza dough from your local pizza shop.
Yes, I know I have spent a terrific amount of time preaching the virtues of homemade, dead-easy pizza dough but you know what? Sometimes, even I get tired of eating dinner at 10:30 p.m. in the name of purist cooking pursuits. [I hope you were sitting down for that one.] Go to your local pizza shop and ask to buy a dough. In NYC, this is a cinch, of course, and the doughs run about $3 each. Once you get it home, it’s ready to go. Heck, that’s even faster than ordering one from that Shmomino’s racket!


Cilantro Chili Pizza

Weary and tired, Sweets and I dragged our jet-lagged bodies into our rental car, and headed up the coast line to Hilo to eat up time before we could collapse in the vacation house we had rented. The ten hour flight did not lend itself to a full night’s sleep, which only contributed to us feeling a bit more out of our element than usual.
My job as navigator proved to be challenging as well,
“Umm… take a left at this next K-street”.
“K- street? Can you sound it out?”
“No…” I whined not sure what to make my mouth do with all the vowels., “Kam-ah…” in my head whirled the bad Hawaiian joke seen on t-shirts in high school: Kam-on-a-wana-lai-u?
Magically our car was pulled in the direction of good food and we found ourselves at Cafe Pesto. In an unexpected fit of nostalgia we giggled at the appearance of Oregon Chai on the menu and ordered iced sweet chai and a Southwestern pizza. What came to us from that kitchen is one of the best pizzas I have ever tasted…tangy chipotle chicken on a bed of garlicy cilantro pesto, and topped with red onion rings, smooth creamy goat cheese crumbles and sweet chili sauce. We swooned, finishing off every slice, licking the sweet vinegar sauce off of our fingers.
This flavor combination of cilantro pesto and sweet chili sauce has become a cult favorite in our house ever since…

Cilantro Chili Pizza, ala Cafe Pesto
Preheat the oven to 500F, preferable with a pizza stone on the middle shelf. Allow the oven to heat 30 minutes or more.
Meanwhile, prep your favorite pizza dough. If using refrigerated pizza dough, allow it to come to room temperature before shaping. Preparation of the pesto and chili sauces can be accomplished in the time it takes for the pizza dough to rest:


Cilantro Pesto
   This recipe makes more pesto than needed for pizza. Use the leftovers as a marinade for grilling, or go crazy making this pizza for all of your friends.
 In a food processor or blender combine:
  • 1/2 cup peeled garlic cloves
  • 1 cup of cilantro leaves, stems and roots
  • 1 Tbs of ground pepper
  • 1 tsp of salt
  • with enough canola or olive oil to help grind the ingredients into a paste
 Store in the refrigerator or freezer with a slight film of oil on the pesto surface to help maintain the bright green color.


Sweet Hot Garlic Sauce
   This is my number one favorite ingredient, to always be found in my refrigerator. It is excellent paired with fried crispy foods, grilled meats, drizzled on curries, and on top of this pizza. Fortunately this tasty sauce is becoming increasingly common in grocery stores, often called Nahm Jeem Gratiem, or Tuong Ot Ngot.
 In a sauce pan combine
  • 1 cup sugar
  • 1/2 cup water
  • 1/2 cup vinegar
  • 2 Tbs minced garlic
  • 1 tsp salt
 Bring to a boil and reduce the heat to low, simmering to reduce and thicken to a syrupy sauce approximately 20 minutes or more. When thickened, stir in 1 Tbs of chili garlic sauce and allow to cool to room temperture. Store in the refrigerator.


Cilantro Chili Pizza

Shape your pizza dough in the size you want, stretching it out thin with your fingers and hands. Place it on a piece of waxed paper, trimmed to match the foot print of the pizza dough shape and transfer the dough to a pizza peel for easy sliding onto the pizza stone.
Spread several tablespoons of the cilantro pesto on the surface of the dough. Sprinkle with a slight pinch of salt. Continue to top the pizza with chopped sundried tomatoes,red onion slices and chopped red bell pepper.
Slide the pizza onto your hot pizza stone and cook until the bottom is crusty brown, approximately 5-8 minutes.
Immediately top the pizza with crumbled goat cheese upon removing it from the oven. And lastly, the most important step, drizzle the pizza with Sweet Hot Garlic Sauce.
This pizza is also excellent topped with any grilled meat or seafood. If the goat cheese is omited this is a very tasty vegan meal.
Enjoy!

Making The Case For Beets

Big, beautiful beets
Two years ago, cilantro haters were vindicated. The New York Times ran a story, Cilantro Haters, It's Not Your Fault, in which Harold McGee, respected food scientist and author, explained why cilantro really does taste like soap to many people. Turns out, some folks "may be genetically predisposed to dislike cilantro."
Now, I'd like to see Harold tackle beets. This vegetable suffers all sorts of indignities. People say they taste like metal, mud, wood, even dirty socks. (Dirty socks? Really? That's hard-core beet hate.)
What's behind all this beet antipathy? Is it chemistry? Genetics? Canned beets? President Obama? (He famously banned them from the White House garden.)
Unlike the president, I adore fresh beets, which are at their sweetest from May through September. Some beets, especially dark red ones, have a sweetness close to sugar, while others admittedly taste a little like dirt, or as beet lovers prefer, "earthy."
I've given some thought to this beet bashing, and here's what I've come up with: canned beets. Other than canned string beans, it's hard to find a more repugnant vegetable — freakishly iridescent and disturbingly mushy. Nothing good comes from canned beets.
Many people claim beets taste metallic. This could be because of the metal can, which studies have shown tastes like metal. But that doesn't explain why many people say fresh beets taste like metal. Perhaps it's iron. Beets are high in iron, which is why they're recommended for people with anemia.
Then there's dirt. Maybe they taste like dirt because they have not been properly cleaned and still have dirt clinging to them. Dirt tastes like dirt. Or it could be geosmin, a compound that gives beets their distinctive, dirtlike flavor.
Irwin Goldman, a beet breeder and professor of horticulture at the University of Wisconsin, is trying to help with the beet-dirt issue. He's working to breed beets higher in geosmin for people who like that distinctive dirty flavor, as well as beets lower in geosmin for those who prefer more sweetness.
In spite of their detractors, beets are experiencing a culinary heyday. Innovative food bloggers, writers and chefs are sharing recipes for raw beet salads, beet carpaccio and beet tarts. Beet confections have blossomed as well, especially mysteriously dark chocolate-beet cake, cupcakes and brownies. There's even beet ice cream, on which the jury is still out.
Chefs are smitten with diminutive, jewel-colored baby beets as well as full-sized gold beets with their sun-soaked yellow flesh. Is there a hip eatery that does not serve a roasted beet and goat cheese salad?
Nothing has elevated beets' status as powerfully as Chioggia beets, also known as candy-stripe or candy-cane beets due to their festive red and white striations. When they appear at my local farmers market, they cause traffic jams. (Keep in mind that cooking diminishes their color, so for the most dramatic presentation, serve Chioggia beets raw.)
When selecting beets, look for deeply colored, smooth, firm-skinned globes with the leaves attached. Avoid beets that are soft, shriveled, pitted or spotted. If storing, cut off the leaves, and trim the stems to about 1 inch. Wrap in paper towel, place inside a plastic bag, and refrigerate for seven to 10 days.
When you're ready to eat them, wash beets thoroughly, scrubbing the skin to dislodge any dirt, then cut off the stem. You can boil, steam, microwave and even grill beets, yet roasting is the kindest cooking method, as the heat gently caramelizes the vegetable's natural sugars. Plus, the skins practically slide off after roasting. Of course, you can also enjoy beets in all their raw glory. Grated, shaved or sliced paper-thin, they're bursting with color and crunch.
The red and white striations of the Chioggia, or candy cane, beet. i
The red and white striations of the Chioggia, or candy cane, beet.
Susan Russo for NPR
As for the beet greens, whatever you do, don't throw them away unless they're mildewed, browned or full of holes. Fresh beet greens should be unwilted and richly colored. They're similar in taste to Swiss chard and are a delicious alternative to more prosaic spinach.
To prepare them, cut off any thick stalks. Submerge in a large bowl of water to loosen the dirt. Drain, rinse and repeat as necessary, then pat dry. Par-boil them by dropping in boiling water for one minute. Remove and plunge into a bowl of ice water. "Shocking" the greens will keep them bright and beautiful. Drain, and store in an air-tight container in the refrigerator for up to three days. Beet greens are wonderful simply sauteed in olive oil and garlic, tossed into scrambled eggs and pasta or added to soups and stews. They're also delicious raw, thinly sliced and added to salads and sandwiches.
As for flavor pairings, beets have an affinity for tangy, pungent foods such as goat, blue and feta cheeses, sour cream, yogurt, horseradish and onions; acidic foods such as oranges, lemons and vinegars; and smoky foods such as bacon, smoked fish and smoked meats. They also pair well with legumes, especially lentils; whole grains such as barley, bulgur and quinoa; and most nuts, particularly pistachios and walnuts.
If you have a tenuous relationship with beets, consider starting simply. Roasted beets sprinkled with good olive oil, salt, black pepper and fresh herbs such as rosemary or thyme are one of the tastiest ways to enjoy beets. So, too, is crostini topped with goat cheese, sliced roasted beets, lemon juice, sea salt and olive oil. Crunchy raw beet salads are an attractive option as well, especially when tossed with shredded carrots, apples, raisins and walnuts and coated with a creamy tahini or yogurt dressing.
I hope folks like Irwin Goldman and Harold McGee shed some light on this dirty issue soon because clearly it's not on President Obama's agenda. While I wait, I'll be slurping my beet smoothies, spooning my beet soup and crunching my beet chips with abandon.

Raw Chioggia Beet Salad With Honey-Lime Vinaigrette

This stunning salad is ideal for summertime alfresco dining and dinner parties. Enjoy it on its own as a light meal, or serve alongside grilled fish or meat.
Raw Chioggia Beet Salad With Honey-Lime Vinaigrette i
Susan Russo for NPR
Makes 4 to 6 servings
Vinaigrette
2 tablespoons olive oil
2 tablespoons cider vinegar
2 tablespoons lime juice
2 teaspoons honey
1/4 teaspoon salt
1/4 teaspoon cayenne pepper
Salad
4 medium Chioggia beets, washed, peeled and cut into matchsticks (about 1 1/4 to 1 1/2 pounds), or another beet variety if Chioggia isn't available
2 scallions, thinly sliced (about 1/4 cup)
2/3 cup chopped fresh cilantro
2 tablespoons roasted unsalted or salted pepitas*
Whisk all vinaigrette ingredients in a small bowl and set aside.
Wash and peel beets. (You may want to wear gloves, as the beets may stain your hands.) Using a sharp knife, cut into matchsticks. Place beets in small bowl. Add scallions, cilantro and pepitas, and toss. Add vinaigrette and toss until well coated. Serve at room temperature.
Variation: Add diced avocado or crumbled queso fresco, a soft, mild, lightly salted Mexican cheese available in Mexican specialty markets and most major supermarkets.
* Available at most major supermarkets and Mexican specialty markets

Red Rice, Roasted Beets And Greens

In this recipe, the beets stain the rice red, hence the name. It's perfect for picnics and summer cookouts and also makes a satisfying vegetarian entree.
Red Rice, Roasted Beets And Greens i
Susan Russo for NPR
Makes 4 servings
Rice
1 cup wild rice or brown rice
1 tablespoon olive oil, divided
1 bunch fresh beet greens, washed and sliced
3 medium red beets (about 1 to 1 1/4 pounds), stems removed
2 tablespoons crumbled feta cheese
2 tablespoons unsalted toasted pistachios
Dressing
2 tablespoons olive oil
2 tablespoons red wine vinegar
1/2 teaspoon sugar
1/2 teaspoon lemon zest
4 teaspoons lemon juice
2 tablespoons chopped fresh mint, plus extra for garnish
In a medium pot, bring rice and 2 1/2 cups of water to a boil. Reduce, partially cover and simmer for 25 to 30 minutes, or until the water is absorbed and the rice is firm yet cooked through.
Place a large skillet over medium-high heat. Add 1 teaspoon olive oil. Add sliced beet greens and saute for 3 to 5 minutes or until softened. Remove from heat.
Preheat oven to 400 degrees. Wash beets. Place on a large piece of aluminum foil, drizzle with olive oil and wrap tightly. Place on a rimmed baking sheet and cook for 50 to 60 minutes, or until tender when pierced with a knife. Remove from oven and cool. Rub off the skins and cut into small pieces.
To make the dressing, whisk all ingredients in a small bowl and set aside.
To assemble the salad, transfer the rice to a serving bowl. Add the cooked beets, greens and dressing. Toss lightly. Sprinkle with crumbed feta cheese and pistachios and garnish with thinly sliced fresh mint.

Gingery Roasted Beet And Sweet Potato Soup

Borscht and I have never gotten along, but I've become good friends with this cheerful soup. The fresh ginger adds brightness, while the cayenne pepper packs some heat. Though delicious right away, this soup tastes even better the next day. You could serve it cold or at room temperature, but its flavors are fullest when heated through.
Gingery Roasted Beet And Sweet Potato Soup i
Susan Russo for NPR
Makes 4 servings
3 red beets (about 1 to 1 1/4 pound)
1 large sweet potato, peeled and cut into chunks (about 1 pound)
1 1/2 tablespoons olive oil, plus 1 tablespoon, divided
1/8 teaspoon salt
1/8 teaspoon black pepper
1 medium yellow onion, diced
2 stalks celery, diced
2 cups low-sodium vegetable broth
Juice of 1 lime
1 tablespoon fresh minced ginger
1/3 cup fresh chopped cilantro
1/4 teaspoon cayenne pepper
1 (15-ounce) can light coconut milk
Preheat oven to 375 degrees. Wash and peel the beets and sweet potato, and cut into 1-inch pieces. (You may want to wear gloves, as the beets may stain your hands.) Place beets and sweet potato on a large rimmed baking sheet. Drizzle with 1 1/2 tablespoons olive oil, salt and black pepper. Roast for 25 to 30 minutes or until lightly browned and tender when pierced with a knife. Remove from oven and set aside.
In a large pot over medium-high heat, add remaining 1 tablespoon olive oil. Add onions and celery and saute 5 to 7 minutes, until softened and lightly browned. Transfer the cooked beets and potato to the pot. Add the broth, lime juice, ginger, cilantro and cayenne pepper and stir well. Cook for 10 minutes. Cool for 10 minutes before pureeing. Working in batches, add soup and coconut milk to a blender and puree until smooth. For a velvety smooth consistency, you can strain the soup through a sieve. I like a few tiny bumps, so I leave it as is. Season with salt and pepper to taste.

Beet Smoothie

This ruby red breakfast smoothie is as healthy as it is eye-catching. You may even get your kids to drink it.
Beet Smoothie i
Susan Russo for NPR
Makes 1 serving
1 small roasted beet, chopped
1/2 frozen banana
1 to 1 1/4 cup milk of your choice, such as almond, soy or low-fat milk, depending on how thick you prefer it
1 teaspoon honey
Mix all ingredients in a blender and puree until smooth. Pour and enjoy.

Patriots' Potato Pizza

Like most Italian families, my mom did the cooking, my dad did the eating. There were however certain culinary “events” that my dad performed with gusto such as pickling, canning, and making homemade pasta. For a period in the mid-90’s, he started making pizzas, really good pizzas. One Sunday, most likely during a Patriots game, he came up with the idea for potato pizza. It was a hit then and continues to score touchdowns with everyone who eats it.

By the way, the Patriots beat San Diego today. I have mixed emotions. Growing up in Rhode Island, it was mandatory to root for the Patriots. Plus my Dad would’ve grounded me if I didn’t. Yet, Jeff and I have become Chargers’ fans and would have liked to see them win today. Actually, we’re already over it. This seems to be the way things are here in Southern California; when a professional sports team loses, it’s like, “So, you wanna go to the beach now?” Not so in New England. Take when the Red Sox lost to the Mets in ’86 for example. Jeff's family barely spoke for a week; there were no words for their grief. So, it’s probably a good thing that the Patriots won.

Having gotten completely frustrated with San Diego’s abysmal performance today, Jeff and I took a walk after the game. When we returned home, the answering machine was flashing “1 new message.” We hit play and heard my dad's voice: “What’s the matter Doc, you taking some aspirin for your headache after that great New England win over your unbeatable Chargers?” Did I also mention that New England fans rarely gloat?

Since Dad was on my mind today, I thought I’d make his potato pizza (the next best thing to watching the game with him). I used blue and white potatoes because I think it makes the pizza more visually appealing. Of course, I just realized that blue and white are the Patriots’ colors. Hmmm, maybe I subconsciously wanted them to win after all.


DAD’S POTATO PIZZA1 pound pizza dough
2 teaspoons olive oil, divided
1 shallot, sliced
¼ cup shredded part-skim milk mozzarella cheese
2 small potatoes of your choice, preferably a firmer variety
¼ cup crumbled gorgonzola or blue cheese
1 teaspoon fresh rosemary, chopped
Salt and pepper, to taste

Wash potatoes and pat dry. Microwave the whole potatoes for 2-3 minutes until soft enough to handle but firm enough to cut so they won’t crumble. Cut into ¼ inch-thick slices.

Heat half the olive oil in a skillet over medium heat; add shallots; cook 4-5 minutes until slightly browned.

Preheat oven (see temps below). Roll out dough on a lightly floured surface. Transfer to a sheet of parchment paper (if using a stone) or to a parchment lined baking sheet. Brush dough lightly with remaining olive oil. Place a thin layer of shredded mozzarella on the dough, then arrange potato slices on top. Season well with salt and pepper. Add crumbled gorgonzola or blue cheese, and lightly press it down with your hands.

For a pizza stone, bake at 500 degree for about 10 minutes, or until both the top and bottom of the crust is brown and the cheese is melted.

For a baking sheet, bake at 450 for about 20 minutes, or until both the top and bottom of the crust is brown and the cheese is melted. Let it cool for a couple of minutes before slicing.

Before serving, sprinkle pizza slices with chopped fresh rosemary and a bit more fresh ground black pepper.

TIP: Boiling the potatoes makes them too moist which leads to a soggy crust. Ugh. Microwaving or baking them are better bets. Also, adding the fresh rosemary after removing the pizza from the oven helps to maintain its color and flavor.

Homemade Pizza Recipe

Pizza dough is a yeasted dough which requires active dry yeast. Make sure the check the expiration date on the yeast package.
You can use all purpose flour instead of the bread flour that is called for in the recipe, but bread flour is higher in gluten than all-purpose flour and will make a crispier crust for your pizza.

Ingredients

Pizza Dough: Makes enough dough for two 10-12 inch pizzas
  • 1 1/2 cups warm water (105°F-115°F)
  • 1 package (2 1/4 teaspoons) of active dry yeast
  • 3 1/2 cups bread flour
  • 2 Tbsp olive oil
  • 2 teaspoons salt
  • 1 teaspoon sugar
Pizza Ingredients
  • Olive oil
  • Cornmeal (to help slide the pizza onto the pizza stone)
  • Tomato sauce (smooth, or puréed)
  • Mozzarella cheese, grated
  • Parmesan cheese, grated
  • Feta cheese, crumbled
  • Mushrooms, thinly sliced
  • Bell peppers, stems and seeds removed, thinly sliced
  • Italian sausage, cooked ahead and crumbled
  • Chopped fresh basil
  • Pesto
  • Pepperoni, thinly sliced
  • Onions, thinly sliced
  • Ham, thinly sliced
Special equipment needed
  • A pizza stone, highly recommended if you want crispy pizza crust
  • A pizza peel or a flat baking sheet
  • A pizza wheel for cutting the pizza, not required, but easier to deal with than a knife

Method

Making the Pizza Dough

1 Place the warm water in the large bowl of a heavy duty stand mixer. Sprinkle the yeast over the warm water and let it sit for 5 minutes until the yeast is dissolved. After 5 minutes stir if the yeast hasn't dissolved completely. The yeast should begin to foam, which indicates that it is still active and alive.
pizza-1.jpg
2 Using the mixing paddle attachment, mix in the flour, salt, sugar, and olive oil on low speed for a minute. Then replace the mixing paddle with the dough hook attachment. Knead the pizza dough on low to medium speed using the dough hook until the dough is smooth and elastic, about 10 minutes.
If you don't have a mixer, you can mix the ingredients together and knead them by hand.
If the dough seems a little too wet, sprinkle it with a little more flour.
pizza-2.jpg pizza-3.jpg
3 Spread a thin layer of olive oil over the inside of a large bowl. Place the pizza dough in the bowl and turn it around so that it gets coated with the oil. Cover the dough with plastic wrap and let sit in a warm place (75-85°F) until it doubles in size, at least 1 to 1 1/2 hours. You can let it sit for several hours if you want. The longer rise will improve the flavor of the pizza crust. If you don't have a warm spot in the house you can heat the oven to 150 degrees, and then turn off the oven. Let the oven cool till it is just a little warm, then place the bowl of dough in this warmed oven to rise.
At this point, if you want to make ahead, you can freeze the dough in an airtight container for up to two weeks.

Preparing the Pizzas

1 Place a pizza stone on a rack in the lower third of your oven. Preheat the oven to 450°F for at least 30 minutes, preferably an hour.
2 Remove the plastic cover from the dough and punch the dough down so it deflates a bit. Divide the dough in half. Form two round balls of dough. Place each in its own bowl, cover with plastic and let sit for 10 minutes.
3 Prepare your desired toppings. Note that you are not going to want to load up each pizza with a lot of toppings as the crust will end up not crisp that way. About a third a cup each of tomato sauce and cheese would be sufficient for one pizza. One to two mushrooms thinly sliced will cover a pizza.
pizza-4.jpg pizza-5.jpg
4 Working one ball of dough at a time, take one ball of dough and flatten it with your hands on a slightly floured work surface. Starting at the center and working outwards, use your fingertips to press the dough to 1/2-inch thick. Turn and stretch the dough until it will not stretch further. Let the dough relax 5 minutes and then continue to stretch it until it reaches the desired diameter - 10 to 12 inches. Use your palm to flatten the edge of the dough where it is thicker. You can pinch the very edges if you want to form a lip.
austin-pizza.jpg
5 Brush the top of the dough with olive oil (to prevent it from getting soggy from the toppings). Use your finger tips to press down and make dents along the surface of the dough to prevent bubbling. Let rest another 5 minutes.
Repeat with the second ball of dough.
pizza-6.jpg pizza-7.jpg
6 Lightly sprinkle your pizza peel (or flat baking sheet) with corn meal. Transfer one prepared flattened dough to the pizza peel. If the dough has lost its shape in the transfer, lightly shape it to the desired dimensions.
pizza-8.jpg pizza-9.jpg
7 Spoon on the tomato sauce, sprinkle with cheese, and place your desired toppings on the pizza.
pizza-10.jpg
8 Sprinkle some cornmeal on the baking stone in the oven (watch your hands, the oven is hot!). Gently shake the peel to see if the dough will easily slide, if not, gently lift up the edges of the pizza and add a bit more cornmeal. Slide the pizza off of the peel and on to the baking stone in the oven. Bake pizza one at a time until the crust is browned and the cheese is golden, about 10-15 minutes. If you want, toward the end of the cooking time you can sprinkle on a little more cheese.

Tourte de Brandade, or Salt Cod Tart

Seattle may spend eight months out of twelve under cloudy skies, but come summer, it puts on its sunscreen and pulls out all the stops. There are countless concerts and block parties and festivals here and there, including the seemingly never-ending SeaFair, with its deafening air shows, hydroplane races, and—because every port city needs a few—professional pirates. That said, however, the only local summer event that gets a dedicated slot on my calendar is—all apologies, dear reader—invitation-only. But if you drive around a certain part of western Washington on a certain Sunday and happen to spot a homemade sign featuring a cotton-ball-clad lamb, well, follow the arrow, and you’ll too find yourself at the Knight family lamb roast.

It was a good thing that Kate and I had recently relieved her family’s garden of some of its burden, because it would soon fill again with an onslaught of edibles, this time including a homegrown lamb on a spit, platters full of dolmas, four pans of baklava, three coolers of beer, two bottles of ouzo, and a few dozen assorted friends and family.

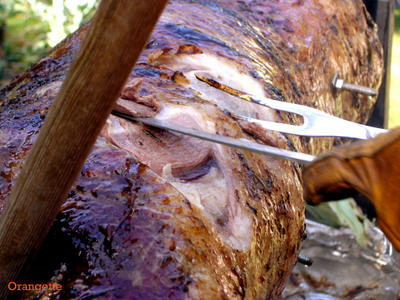
I arrived a little after one with an armload of my own, balancing a tourte de brandade and two plates of brownies*. It was still quiet—no one would arrive until after three—and walking in from the street felt like descending into another element, with the garden spilling out at my side, chickens clucking somewhere around the corner, and at the end of the driveway, the house tucked deep under the trees. The yard was in full bloom, with tomatoes of every shape and size, lettuces, Romano beans, herbs, potatoes, corn, and carrots, not to mention a gnarly swath of raspberry bushes, beds of dahlias and daisies, and pear, plum, and apple trees. And between a trellis of beans and the garage, the lamb, aptly dubbed “Briquette,” spun quietly over the coals in time to twangy country music playing from a nearby radio.

With the smell of so much meat in the air, it wouldn’t be quiet for long. Guests trickled in, bearing swim suits and bowls full of food, and while Briquette bronzed, they worked up an appetite in the lake, splashing around on surfboards and in sailboats. Meanwhile, I whet my own with a few sips of ouzo—and began planting the seeds for a slow but steady movement toward the groaning buffet tables.
There, under the shade by the side of the house, bowls of pasta salad jostled with pickled vegetables, which butted up against roasted beets with fresh herbs, noodles, heirloom tomatoes and fresh mozzarella, hummus, olives, Vietnamese pancakes filled with ground meat and bean sprouts, baskets full of litchis, pies, plum puddings, compotes, and cookies. And then, of course, there was the lamb, rich and earthy and ringed with fat from seven months of grazing on lush local grass.


We dispersed ourselves around the yard, sitting on the ground or leaning here and there, balancing paper plates on our knees and fending off the chickens, who’d been, much to their delight, liberated from the hen house to root in the loose dirt of the garden. And there was more ouzo, and soon that happy stupor that follows anticipation. There’s a strange, delicious limbo zone one enters after this kind of feasting, when the mind and the senses are both quieted and sharpened, slow but nimble.

Down by the water, Kate slid the sailboat out for one more go before nightfall, and before anyone could wake to the end of summer, I snuck away with my dirty plates, my skin still warm from the sun.

*Recipe forthcoming.
[And special thanks to Robert Hass for the cribbed title of this post, which comes from one of my favorite poems, "Meditation at Lagunitas."]


Tourte de Brandade, or Salt Cod TartAdapted from Saveur

When I announced that I’d be bringing a Provençal salt cod tart, Kate responded with resounding approval—that’s my girl!—even though she’d never tasted brandade, or a mousse of salt cod, olive oil, garlic, and cream. True, it may sound a bit odd—off-putting, even—but once tasted, you won’t think twice. Brandade is rich, garlicky stuff, creamy and savory, the flavor of the cod having been tempered and soothed by salting and drying. The mousse is spread atop a layer of slow-simmered tomato sauce inside a puff-pastry shell, and when baked, it puffs lightly and turns a gorgeous shade of gold. Best served when still warm, it is also perfectly delectable at room temperature—terrific picnic, or lamb roast, fare.

1 ½ Tbs extra-virgin olive oil, plus ¾ cup, warm
1 small yellow onion, peeled and minced
3 medium tomatoes, cored and chopped
Leaves of 2 sprigs fresh thyme
1 bay leaf
A pinch of sugar
Freshly ground black pepper
¾ lb boneless, skinless dried salt cod, soaked overnight in abundant water, drained, rinsed, and cubed
4 cloves garlic, peeled and chopped
1 ½ Tbs heavy cream
Salt
3 Tbs crème fraîche
1 large egg
1 sheet puff pastry, such as Dufour

Heat 1 ½ Tbs olive oil in a small saucepan over medium heat. Add the onions, and cook until soft. Add half the garlic and the tomatoes, thyme, bay leaf, sugar, and salt and pepper to taste. Reduce the heat to medium-low, and simmer the sauce until it is as thick as a paste, about 40-45 minutes. Discard the bay leaf, and set the sauce aside.

While the tomato sauce cooks, bring a medium pot of water to a boil; remove it from the heat, and add the cod. Cover the pot, and let it rest for 7 minutes. Drain the cod into a colander or sieve; then transfer it to a food processor. Add the remaining garlic, and process to combine. With the motor still running, gradually add ¾ cup warm olive oil through the feed tube in the processor lid; then add the cream. Adjust the seasonings with salt. Transfer the mousse to a bowl, and stir in the crème fraîche and the egg. Set it aside.

Put a pizza stone on the middle rack of the oven, and preheat the oven to 
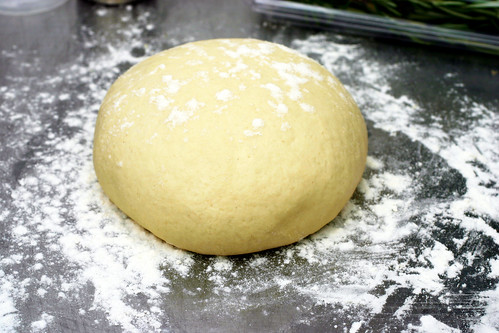
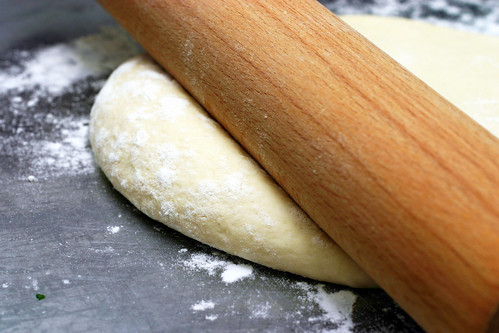
425 degrees Fahrenheit. Roll the puff pastry out on a floured surface to a large, 1/16”-thick round. Fit the pastry into a removable bottom tart pan (the original recipe calls for an 11” pan, but I used a 9” with no problems), and trim the edges. Prick the pastry all over with a fork; cover it with plastic wrap; and chill it for 30 minutes.
Remove the tart shell from the fridge, and spread the tomato sauce in a thin but thorough layer over the bottom (you may have some sauce left over); then cover it with the salt cod mixture. Bake the tart on the pizza stone until golden brown, 20-25 minutes. Serve warm.

oached Halibut with Sweet Garlic, Parsley, and Lemon

Alright, people. I know what you’re thinking. Man, Molly’s sure been sucking down the butter these days. How about those fritters? Did Orangette get sponsored by a cardiologist or something? By all appearances, it’s been a regular fat fest at my place lately, with lipids on parade and Dessert Day everyday. But at the risk of silencing the ole Brown Butter Marching Band, I just want you to know—lest you should worry—that I have also been eating other things. In fact, just like Mom taught me, I can’t have dessert until I finish my dinner. My palate and I are very well trained.
And lucky for us, it’s May. The farmers’ markets are returning like so many migrating birds, staking out territory all over town. There are early baby greens and little pots of herbs to take home for planting. There are bundles of asparagus, piles of artichokes, and heads of cauliflower the size of softballs, curled into neat green bonnets of leaves. And then there is the sign of spring in Seattle—right up there, in my opinion, with Copper River salmon, cherry blossoms, and entire days of sunlight: the full-scale arrival of fresh Alaskan halibut. Even the janky grocery store in front of my apartment gets in on the excitement, unfurling a garish plastic sign that screams, “Alaskan Halibut is Here!” I mean to tell you, I love May.
To me, May means a welcome invitation to stop fussing with my food. For as much as I love winter’s languid braises and slow bakes, by the time spring rolls around, it’s a relief to sit down to a steamed artichoke, period, with maybe a pot of melted butter or homemade mayonnaise. Give me a spring salad, a fresh egg softly boiled, or a heel of coarse bread with butter, salt, and radishes. Or, in the case of this week, put me in front of the stove with a pan of water, garlic, and parsley, and hand me a piece of halibut.

Until a few nights ago, I never would have imagined myself stumping for poached fish, a concept that, for me at least, conjures up visions of pale, pasty, sickly-looking protein, sucked dry—perhaps vampire-style—of all color and nutrients. But this method, from Italy by way of Lynne Rossetto Kasper, has convinced me otherwise. It begins with a skillet of water seasoned with salt, crushed whole garlic cloves, and branches of Italian parsley, and it ends with a plump, snowy-fleshed piece of halibut, silky and fragrant. Along the way, the water is transformed into a salty, herbal broth—like seawater, but better—which infuses the fish and coaxes out its clean, sweet flavor. The garlic softens and mellows, ceding its sharp bite for round edges, winding itself gently around the fish and following it to the plate. Finished with a squeeze of fresh lemon and a slip of olive oil, this is no cafeteria-style fish. It’s more like spring in piscine form—and a very good prelude to dessert.


Poached Halibut with Sweet Garlic, Parsley, and Lemon
Adapted from Lynne Rossetto Kasper’s Weeknight Kitchen newsletter

The key to this preparation is Freshness, with a capital F. This dish is built to showcase the clean, delicate flavor of fresh fish and nothing less. Ask your local fishmonger—or even the fish guy at the grocery store, if that’s your best option—when he gets his deliveries, and save this recipe for those days. If you are in Seattle, get yourself—quickly!—over to Wild Salmon Seafood Market, where the fishmongers know their business and get halibut, fresh off the boats, once or twice a day. Likewise, make sure that you use a good, fresh head of garlic: there should be no green shoots poking from the top, and each clove should feel smooth, solid, and not the least bit spongy. And be sure to use an olive oil that, as Rossetto Kasper says, you would want to eat from a spoon. From there, it’s hard to go wrong.

4 cloves garlic, peeled and crushed
8 branches Italian parsley
1 tsp salt
Water
2 (~6-oz.) halibut fillets, skin removed, or another firm, white-fleshed fish such as cod, tilapia, or catfish
Additional Italian parsley branches, for garnish
2-4 juicy lemon wedges, for garnish
Good-tasting extra-virgin olive oil, for serving
Salt
Pepper

Place the garlic, Italian parsley, and salt in a 12-inch skillet or sauté pan. Add water to a depth of about 2 inches. Bring to a simmer, cover, and let cook for 5 minutes. It should smell very fragrant.

Meanwhile, measure the thickness of the halibut fillets. They will cook for 8 to 10 minutes per inch of thickness.

When the poaching liquid is ready, slip the fillets gently into the pan. Cook for 8 to 10 minutes per inch, adjusting the heat so that the liquid just trembles: it should only bubble a little, and very gently. To test the fish for doneness, make a small slit with a paring knife in the thickest part of the fillet: all but the very center of each piece should be opaque.

When each fillet is ready, use a slotted spatula to transfer it to a serving plate. Garnish the plates with sprigs of Italian parsley and lemon wedges. Serve immediately, allowing each eater to season their fish at the table with olive oil, salt, pepper, and freshly squeezed lemon.

Bouchons au Thon


My French host mother was tall, trim, and proper, with a sing-song voice and a name that skipped and chimed and rang off the tongue. She moved through the house as though on pointe—softly but decisively—and she wore silver bracelets that clicked delicately against each other when she lifted her hand to secure the barrettes in her long brown hair. She was also very Catholic, with four children, ages 9 to 17; a Labrador puppy; and a husband who’d gone—or rather, all but moved—to Canada to find work. It was complicated and exhausting. She did an admirable job, and she often fell asleep in the bathtub after dinner. But most importantly, dear reader, my host mother was the French equivalent of a Tupperware saleswoman. She tested, cooked in, and sold Flexipan and Silpat products, those fantastic (and fantastically expensive) silicone baking pans, molds, and sheets. I was lucky enough to live under her roof—and within close proximity to her kitchen—for six months. You can well imagine the glory that might have been, had I not taken down the crucifix she’d hung on my bedroom wall.

I arrived that fall, barely twenty-one, deep in my smoky-black eye makeup phase—an era that hasn’t yet ended, actually—and with the short, spiky hair I wore throughout college. I was also a pseudo vegetarian, which threw more than a few grains of sand into the gears of her well-oiled kitchen routine. But she sensed that I was only slightly heretical and very eager to please—still my greatest weakness, I’ll freely admit—and so she took me on, gently correcting my French, delivering clean sheets to my door with admirable regularity, and teaching me how to eat. I arrived a somewhat calculating eater, well-schooled in nutrition and suspecting that butterfat was the devil’s work, and I left smuggling aged chèvres and mimolette in my suitcase.

Each weeknight at eight I’d climb the stairs to the second-floor kitchen and join my squealing pre-teen host brothers (Ta gueule! Casse-toi! (Shut up! Get the hell out of here!)) and catty teenage host sisters (Ta jupe est moche, tu sais? (Your skirt is ugly, you know?)) at the table. We’d begin with a simple grated carrot or beet salad, or half a grapefruit. The boys might argue over the warm steamed leeks with vinaigrette, each wanting the sweet white part closest to the root. Then, depending on the season, we’d move on to a gruyère soufflé; pasta with a sauce of tuna, chopped tomatoes, and sautéed onions; or tartiflette, a wintery baked casserole of potatoes, lardons (absent from my half of the dish, merci), and rich Reblochon cheese from Savoie. It was at that table that I first ate sauerkraut and learned of the nightly cheese plate, stinky and irresistible, with hunks of baguette from the boulangerie next door. And of course there was always dessert: homemade applesauce, a grandmother-style apple or pear cake, or in January, a galette des rois.

At least one night each week we’d have a “Flexipan dinner,” a meal centered on a recipe that my host mother was testing in her silicone molds. Her individual tartlets of caramelized endive with goat cheese were staggeringly good, as was the almost-flourless chocolate cake, which quickly became a staple. But my favorite were the squatty, ugly, and completely delicious bouchons au thon (literally, tuna corks), a mixture of canned tuna, tomato paste, crème fraîche, gruyère, and eggs, baked in muffin molds.


With a texture somewhere between the filling of a quiche and freshly-made country paté, the bouchons tamed the flat, fishy pungency of canned tuna with the smooth richness of dairy and the sweetness of tomato. I gave thanks daily for all that Flexipan brought to my life, but mainly for bouchons au thon.

And as luck would have it, that spring, when my host mother went to visit her husband in Canada, she left me and my youngest host sister alone with a freezer blessedly full of bouchons. Seizing the opportunity, I invited my brand-new French boyfriend over for a dinner of the little tuna corks, roasted vegetables, carefully selected cheeses, crispy-crusted baguettes, and oatmeal chocolate-chip cookies. It was a pure, starry-eyed triumph all around, right through to the next morning, and frankly, I credit the bouchons. I also credit them with earning me, upon my host mother’s return, my first and only “Molly, ce n’est pas un hôtel!” (Molly, this is not a hotel!) speech. I was almost as horrified as she was; apparently I was more heretical than even I’d known.

And it was only the beginning, in so many ways.
When I flew back to the States one painful month later, I tucked the recipe for bouchons au thon in with the contraband cheese.


Bouchons au Thon
Adapted from Demarle, Inc., and my host mother

These bouchons—a crustless tuna quiche of sorts, I suppose—are delicious warm or at room temperature, with a green salad and a good baguette.

180 grams canned tuna in water (preferably chunk light), drained
3 Tbs tomato paste
5 Tbs crème fraîche
3 large eggs
1 cup finely grated gruyère cheese
Salt
Pepper
2 Tbs finely chopped Italian (flat-leaf) parsley
¼ cup minced onion

Preheat the oven to 325 degrees Fahrenheit, and spray 8 wells of a muffin tin with cooking spray (unless, of course, you have a silicone muffin mold, in which case no greasing is necessary). [I've also baked the batter in a single 7-inch silicone cake mold, which essentially negates the name "bouchon" but makes for a nice variation.]

In a medium bowl, break up the tuna with a fork, smashing it to a rough paste. Add the tomato paste, crème fraîche, eggs, gruyère, a good pinch of salt, Italian parsley, and onion, and mix well. The batter should be relatively smooth.

Spoon the batter evenly into 8 wells of the muffin tin, and bake for 20-25 minutes, until set and golden around the edges. [If you choose to use a 7-inch mold as mentioned above, the baking time will be longer; bake until the batter looks set and does not jiggle.]

Whiskey-Soaked Dark Chocolate Bundt Cake

I’m writing this from Oklahoma City, from my old bedroom in my mother’s house, where I used to, as a teenager, write gushy poems about 18-year-old boys with sideburns. I had a real thing for 18-year-old boys with sideburns. I don’t anymore.


I now have a thing for whiskey-soaked dark chocolate Bundt cakes. They hold their liquor better. Among other things.


I can’t talk for long today, because we arrived in Oklahoma around ten o’clock last night and then stayed up too late talking, so I’m tired. I still can’t believe that we even got here, given how snowed-under Seattle is right now. The day before we left, we watched people snowboard down the hill on 65th Street in Ballard. On the way to the airport, we passed a guy on cross-country skis, making his way slowly, cheerfully, up the road. It was all pretty dreamy, really, so long as you didn’t have anywhere important to be. Like the airport, for example, or your mother’s house in Oklahoma. The fact that our flight even left SeaTac yesterday was, we decided, our Christmas miracle. So I think I should keep this short today, and get back to appreciating that miracle by crawling under the covers in my old bed.

But before I do that, I wanted to make sure that you had this Bundt cake recipe. If you haven’t yet had your Christmas miracle, well, ta daaa! Here it is.


I am not, under ordinary circumstances, a great fan of alcoholic desserts. Many of them seem to involve Amaretto, and I just don’t like it. This admission makes me sound sort of boring and unfun, I know, as though I sit around on Saturday nights and read the Oxford English Dictionary with a magnifying glass, but I say it so that you will understand how special this particular alcoholic dessert is. I am a great, great fan of this Bundt cake, or boozy cake, as I like to call it. You have to pronounce that as one word: not boozy cake, but boozycake. Just so you know.

The recipe comes from the New York Times, from an article by Melissa Clark that ran about three weeks ago. It’s a riff on an old Maida Heatter recipe, a rich, dark chocolate cake punched up with not only a quarter-cup of instant espresso, but an entire cup, a cup, ONE CUP, of whiskey. It has a soft, moist, tightly woven crumb, and it makes the kitchen smell very sophisticated, like winter and warmth and the dinner parties my parents used to throw when I was little, after they put me to bed. It smells very chocolatey and very boozy. Because it is very boozy. The night I made it, I cut a slice while it was still a bit warm, and eating it, standing over the kitchen counter, I actually felt a little woozy. And no, I did not intend to make that rhyme. Although once I saw it happening, I didn’t exactly stop it, either.

If you can, try to make this cake a day before you want to serve it, to allow the flavors to mellow and meld. On the first day, the flavor of the alcohol threatens to drown out the chocolate, but after a little overnight rest, they reach a sort of compromise, complementing each other instead of competing, the deep darkness of the chocolate rising to meet the heady afterburn of the whiskey. If you, like us, haven’t trimmed your tree yet, this would be just the kind of thing for that, for eating with one hand while you hang ornaments with the other. To add to the festive feeling, you could even turn on that old Mannheim Steamroller Christmas album, the one that came out in 1984 and that my family continues to trot out every single December. If you eat enough boozy cake, the synthesizers might actually sound kind of nice. Imagine that! What a cake.


Whiskey-Soaked Dark Chocolate Bundt Cake
Adapted from The New York Times

I used St. George whiskey for this recipe, but next time, I think I would use bourbon. Whatever you choose, be sure to use something that you like to drink on its own; its flavor is the real centerpiece here.

2 sticks (8 oz.) unsalted butter, softened, plus more for the pan
2 cups all-purpose flour, plus more for the pan
5 oz. unsweetened chocolate
¼ cup instant espresso powder
2 Tbsp. unsweetened cocoa powder
1 cup bourbon, rye, or other whiskey, plus more for sprinkling
½ tsp. kosher salt
2 cups granulated sugar
3 large eggs
1 Tbsp. vanilla extract
1 tsp. baking soda
Confectioners’ sugar, for garnish (optional)

Preheat oven to 325°F. Grease and flour a 10-cup-capacity Bundt pan (or two 8- or 9-inch loaf pans).

In a heatproof bowl set over – but not touching – a saucepan of simmering water, melt the chocolate until just smooth, stirring occasionally. Let cool.

Put espresso and cocoa powders in a 2-cup (or larger) glass measuring cup. Add enough boiling water to come up to the 1 cup measuring line. Stir until the powders dissolve. Add the whiskey and salt. Let cool.

Using an electric mixer, beat the butter until fluffy. Add the sugar, and beat until well combined. Add the eggs one at a time, beating well after each addition. Beat in the vanilla extract, baking soda and melted chocolate, scraping down the sides of the bowl with a rubber spatula.

With the mixer on low speed, beat in a third of the whiskey mixture. When liquid is absorbed, beat in 1 cup flour. Repeat additions, ending with the whiskey mixture. It may seem like there is too much liquid, but don’t worry; it’s okay. Scrape the batter into the prepared pan, and smooth the top. Bake until a toothpick inserted into the center of the cake comes out clean, about 1 hour and 10 minutes for a Bundt pan. (Loaf pans will take less time; start checking them after 55 minutes.)

Transfer the cake, still in its pan, to a rack. Unmold after 15 minutes and sprinkle warm cake with more whiskey. (I did this by pouring a little bit into a teaspoon, and then shaking the teaspoon over the cake. I’m guessing that I used 3 teaspoons’ worth in all.) Cool completely before serving, garnished with confectioners’ sugar, if you like.

Note: This cake tastes even better on the second day, when the intensity of the alcohol mellows a little bit.

Sweet Potato Pound Cake


I would like to sit down here today and write as though everything were normal, as though I were actually capable of forming complete sentences. But the truth is, I am an absolute maniac. Tomorrow is the official release date for my book, a day that I never really trusted would come, and I feel alternately so ecstatic and so freaked out that I can’t decide whether I need to run around the block a few dozen times or lie down for a nap. In the meantime, I will eat some sweet potato pound cake. As you can see, that’s been my fallback position for a few days now.


Many of you have written already(!) to say that you have the book in your hands, and that you’ve started to read and cook from it, and I want to thank you for that. Thank you. I wouldn’t have written the thing at all if it weren’t for you, and I mean it. I hope that, if you can, you will come out and let me shake your hand and thank you in person. I’ll be looking for you.

To those of you in the Seattle area: I will be at University Book Store tomorrow night - Tuesday, March 3 - at 7:00 pm. I’m baking some coconut macaroons with chocolate ganache for the occasion, and as an added bonus, I will probably be blushing uncontrollably through the entire evening. It’s a show you don’t want to miss. (4326 University Way NE)

To those in the Portland area: I will be at Powell’s this Friday, March 6, at 7:30 pm. I can’t guarantee any macaroons, but I will no doubt still be blushing. (1005 W. Burnside)
I think that’s all for now. I anticipate that I won’t be able to post much for the next couple of weeks, but I will stop by to remind you of where I’ll be, and when, and at what time, and whatnot.

And when I get back, I’ll have a new Delancey update for you. Last week, the wood-burning oven arrived - that’s the first step in building the kitchen - and it’s beautiful. It weighs 3,600 pounds. Its arrival heralded two days of sweat, heavy lifting, and cement-mixing for Brandon, and for me, a few rolls of film and an early morning in my pajamas, helping to move it into position in the soon-to-be kitchen with the help of a plastic protractor, masking tape, and a cart that vaguely resembled a handtruck on steroids. Needless to say, I have some photographs for you. Although none of them feature my pajamas, so don’t get your hopes up.


Until then, be well, bake yourself some sweet potato pound cake, and thank you, always, for being here.


Sweet Potato Pound Cake
Adapted from Southern Cakes, by Nancie McDermott

I was introduced to this cake by my friend Shari, who co-curates the inspiring site this joy+ride. (That’s me in the current issue, #12. Thank you, sweet Shari.) She not only gave me the cookbook that contains this recipe, but she also posted an enticing photo of it on Flickr the other day. She has never led me astray in anything, so I took the hint. I immediately flipped on the oven and pulled some butter out of the fridge, and I suggest that you do the same.

This cake is perfect for late winter: moist, fragrant, warmly spiced, with a flavor a little bit like – and I mean this in a very good way – a spice doughnut. Or maybe an applesauce doughnut. In short, I am going to be making it for a long, long time. You can roast, peel, and mash the sweet potatoes ahead of time, and from there, the cake comes together fairly quickly and easily. The recipe comes with an optional buttermilk glaze, which I used and liked very much, but you could go either way. The glaze is mainly for added flavor and moisture: in my experience, it isn’t one of those types that sits prettily atop the cake, but rather soaks in like a syrup. The overall effect was dangerous. I think I ate about five slices on Saturday. Consider that a warning.

For the cake:
3 ¼ cups all-purpose flour
2 tsp. baking powder
½ tsp. baking soda
½ tsp. freshly ground nutmeg
½ tsp. salt
½ cup milk (low-fat is okay)
1 tsp. vanilla extract
8 oz. (2 sticks) unsalted butter, at room temperature
1 cup sugar
1 cup light brown sugar
4 large eggs
2 cups mashed cooked sweet potatoes

For the buttermilk glaze (optional):
½ cup buttermilk
½ cup sugar
4 Tbsp. (½ stick) unsalted butter, cubed
1 ½ tsp. cornstarch or flour
¼ tsp. baking soda
1 tsp. vanilla extract

Preheat the oven to 350°F. Grease and flour a 10-inch tube or Bundt pan. (If your pan is nonstick, you can get away with just some cooking spray; no need to flour.)

In a medium bowl, combine the flour, baking powder, baking soda, nutmeg, and salt. Whisk well. In a small bowl or measuring cup, combine the milk and vanilla.

In a large bowl, beat the butter, sugar, and light brown sugar until light and fluffy, stopping once or twice to scrape down the sides of the bowl. Add the eggs one at a time, beating well after each addition. Add the sweet potatoes, and mix until the batter is combined. (The batter may look terrible at this point: curdled, weird, terrible. Don’t worry.) With the mixer on low speed, add half of the flour mixture. Beat to just incorporate. Then add half of the milk mixture, and continue to beat on low until well blended. Add the remaining flour, followed by the remaining milk, and beat on low until the batter is thick and smooth.

Scrape the batter into the prepared pan, and bake for 60 to 75 minutes, or until the cake springs back when pressed lightly and a toothpick inserted in the center comes out clean. Cool the cake in the pan on a wire rack for 20 minutes. Run a thin knife around the edge to loosen the cake, and then carefully invert it onto the rack.

Meanwhile, make the glaze, if using. In a medium saucepan, combine the buttermilk, sugar, butter, cornstarch, and baking soda. Place it over medium heat, and bring it just to a gentle boil. Immediately remove it from the heat, stir well, and set it aside to cool to room temperature. Add the vanilla, and stir well.

Set the wire rack - with the cake atop it - over a rimmed sheet pan. Spoon the glaze through a fine-mesh sieve over the warm cake. (I recommend using a sieve because my batch of glaze had some little gelatinous bits of clumped cornstarch in it.)

Cool completely before serving.